Name Western Red Cedar
Location Western North America
Texture/Grain Medium/N/A
Specific Gravity 0.32
Hardness Very Soft
Strength Very Weak
T/R Stability 5.0/2.4%


Guide

Woodworking
Know-How

Woodworking
Tools

 Up     

Sharpening

1. How a Tool
Cuts Wood

(You are here.)

2. Sharpening
Know-How

3. Sharpening
Tools & Materials

4. Sharpening
Chisels & Plane Irons

5. Sharpening
Skews & Gouges

6. Sharpening
Parting Tools

7. Sharpening
Knives

8. Sharpening
Hand Saws

9. Sharpening
Drill Bits

10. Sharpening
Scrapers

11. Touching Up
High Speed Cutters

12. Sharpening
Resources


Looking for
something?

Try these navigation aids:

  Site Map

Site Index

Search the
Workshop Companion

        
Something to share?
Please:

Contact Us!

efore you begin to sharpen a dull cutting edge or grind a new one, it helps to understand just how a tool cuts wood. It seems a simple thing, especially since you may do it hundreds of times a day in your own workshop. But on close inspection, cutting wood is a wonderfully involved process.  

A DEFINITION OF CUTTING


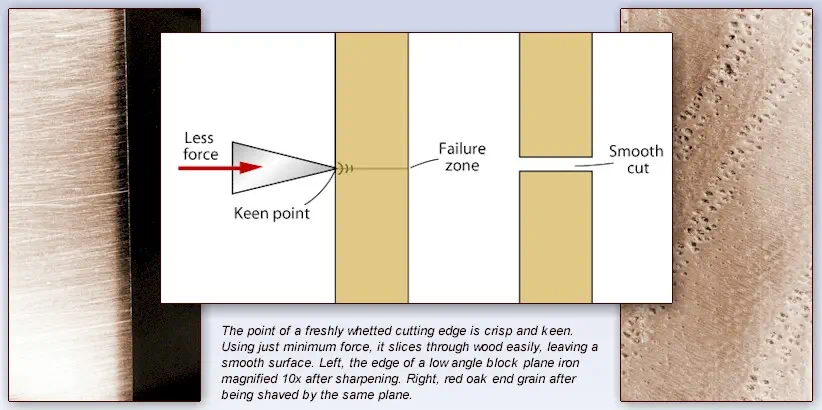
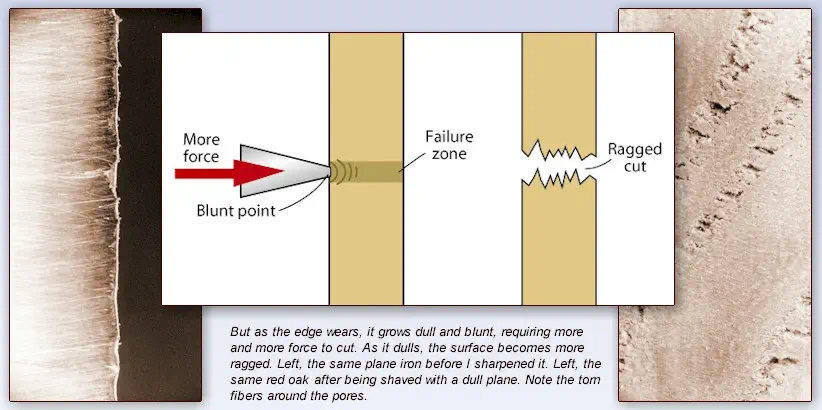
Down at the level where the edge meets individual wood fibers, cutting is synonymous with breaking. The point of the tool presses against the wood fibers with enough force that they break, separating into two pieces. 

A cutting edge concentrates all the force driving the tool at its point. And because a sharp edge contacts only a small amount of the wood surface, the resistance is confined to a tiny area. The keener the point, the smaller the resistance,

and the smaller the force required to cut. The wood fibers separate along a narrow line described by the path of the tool, and the cut surface appears smooth and even.

A blunt or dull tool contacts a larger surface area. Consequently, there is more resistance and it requires more force to cut. The fibers fail along a wider, poorly defined line, and the cut is ragged.


CUTTING EDGE GEOMETRY


Sharpness isn’t the only attribute that affects the cut. The angle at which the tool is sharpened, the angle at which it attacks the wood, and the shape of the cutting edge also determine how a tool cuts. 

TOOL ANGLE

Every cutting edge has a leading face and a trailing face. The angle between the two is the tool angle — the smaller the angle, the less force required to cut. Small tool angle reduce the "wedge effect' of the tools -- they displace less material as they are driven into the wood and therefore require less force. But if the angle is too small, there’s too little metal to buttress the cutting edge and it wears quickly. It may even break or buckle.


What tool angle is best? That depends on the tool and how it’s used. Mallet-driven tools have more obtuse angle than hand tools because they are driven with more force. For the same reason, power tools have greater angles than mallet-driven tools.

TRUE SHARPNESS  – Tool angle is often confused with sharpness. It’s not true that the smaller the angle, the sharper the tool. Sharpness refers to the condition of the edge, not its angle. A router bit, for example, has a high tool angle. But when the point is keen, the edge is sharp.
 

CUTTING ANGLE

The angle at which the cutting edge meets the wood — the cutting angle — is measured from an imaginary line perpendicular to the wood surface. This, more than any other angle, controls how the tool cuts. At a large cutting angle, it lifts the wood fibers as it cuts them; at a small cutting angle, the tool compresses  the fibers, then shears them off.

Because it’s more difficult to compress fibers than lift them, the force required to remove a given amount of wood increases as the cutting angle decreases. Consequently, you must either supply more force or take thinner shavings.

CLEARANCE ANGLE

The angle between the trailing face and the work is the clearance angle. The size of this angle is not particularly important as long as there is one. Without a clearance angle, the cutting edge will not contact the wood.

The absence of a clearance angle is often the reason you cannot cut wood when you find yourself working with an improperly sharpened tool or an extremely dull tool.


When you drive a cutting tool through wood, it lifts and compresses the wood fibers. The force required depends on the cutting angle and the amount of wood removed. As the angle grows smaller, you must either use more force or remove less wood.
 

GRIND

These angles are affected by the shape or grind of the tool. There are three ways to grind a cutting edge — convex (cannel grind), concave (hollow grind) and flat. Chopping tools such as axes often have cannel grinds. The tool angle is high and requires much force to cut, but the cutting edge is very durable. Light-duty tools such as carving chisels are sometimes hollow ground. This reduces the tool angle, making it easier to cut, but the cutting edge is less durable. A flat grind offers a good balance between cutting ease and durability.


TYPES OF GRINDS

GROWING DULL: CHANGING GEOMETRY


As a cutting edge wears, the geometry changes. The edge rounds over — more in the trailing face than the leading face, since the trailing face is in contact with the wood. As this happens, the tool angle increases while the cutting angle and clearance angles decrease. More and more force is needed to drive the tool through the wood, and the cut surface becomes rougher. 


Changing Tool Geometry
 
SEEING THE LIGHT – If you suspect a cutting edge is growing dull, inspect it under a bright light. Because the surfaces of a sharp tool come to a crisp point, the cutting edge reflects no light. But once the edge wears, the rounded surface reflects a line of light. Nicks in the edge show up as bright spots.

Back to the top
 

 "Abundant to all the needs of man, how poor the world would be without wood."
Eric Sloane in Reverence for Wood


Woodworking Design/Wood Strength, part of the Workshop Companion,
essential information about wood, woodwork, and woodworking.
By Nick Engler.

Copyright © 2009 Bookworks, Inc.