Name Bubinga
Location West Africa
Texture/Grain Fine/Closed
Specific Gravity 0.71
Hardness Very Hard
Strength Very Strong
T/R Stability 8.4/5.8%


Guide

Woodworking
Know-How

Woodworking
Tools

 Up     

Sharpening

1. How a Tool
Cuts Wood

2. Sharpening
Know-How

3. Sharpening
Tools & Materials

4. Sharpening
Chisels & Plane Irons

5. Sharpening
Skews & Gouges

6. Sharpening
Parting Tools

7. Sharpening
Knives

8. Sharpening
Hand Saws

9. Sharpening
Drill Bits

(You are here.)

10. Sharpening
Scrapers

11. Touching Up
High Speed Cutters

12. Sharpening
Resources


Looking for
something?

Try these navigation aids:

  Site Map

Site Index

Search the
Workshop Companion

        
Something to share?
Please:

Contact Us!

he cutting edges of augers and drill bits are designed differently and require different sharpening procedures. However, the tools needed are all the same. You need an auger file, a mill file, a slip stone, and a set of ceramic files. 


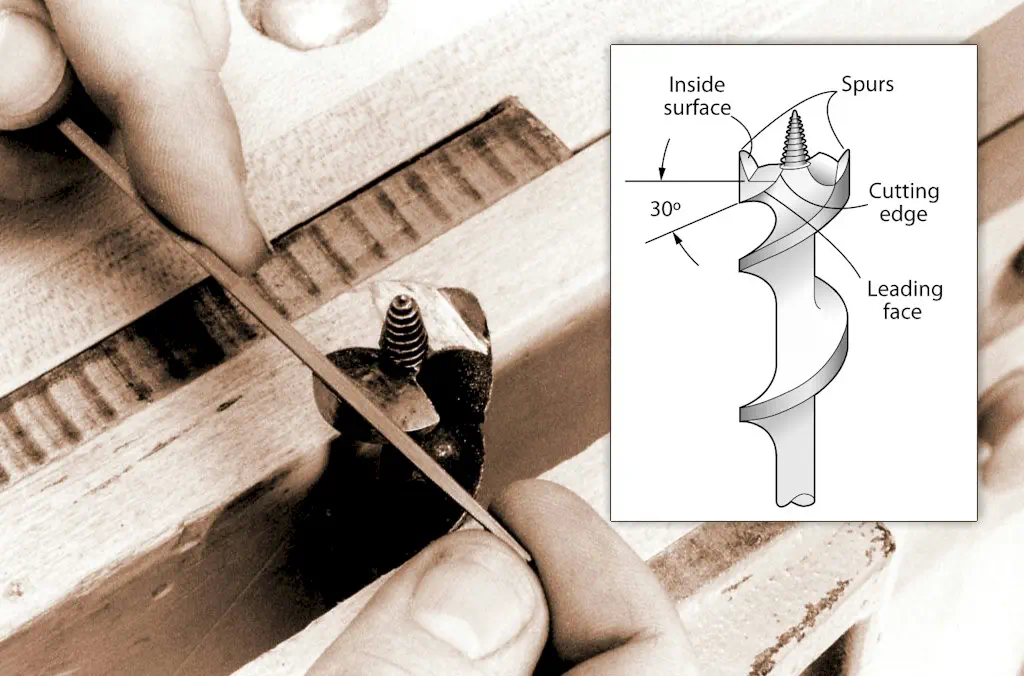
SHARPENING AN AUGER BIT
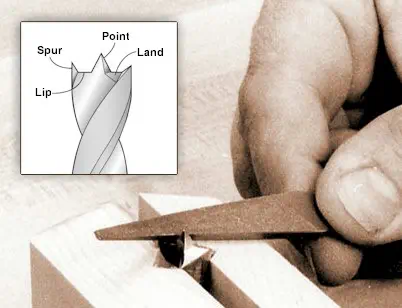


1
Before beginning, take a good look at your auger file. Note that one end has safe edges while the other has safe faces. (A safe file surface has no teeth.) File the inside surfaces of the spurs using the file end with safe edges. After filing, make sure both spurs are the same length. Twist the screw lead into a scrap, holding the body square to the surface. Both spurs should bite into the wood at the same time. If they don’t, file the longer spur until it’s even with the other.


2
After sharpening the spurs, file the leading faces of the cutting edges — the surfaces that face up as you bore a hole. For small augers, use the end of the file with safe faces; for larger ones, use the end with safe edges. Sharpen each cutting edge so the bevel angle is approximately 30 degrees. Afterward, bore a test hole. If one cutting edge takes a thicker shaving than the other, that edge is too long. File the long edge until the shavings are the same thickness.

SHARPENING A SPADE BIT


1
To sharpen a spade bit, first sharpen the flutes with a mill file or auger file. Hold the file at a 10 degree angle (approximately) and file the edges so the ears (outside corners) are even with each other.


2
After filing the flutes, lightly hone the sides of the point with a slip stone. Hold the stone angled back about 10 degrees. Count your strokes and hone each side the same amount to keep the point centered. Don’t hone too much! Unless the bit is badly worn, each side should require only 5 or 6 strokes.

SHARPENING A BRAD-POINT BIT


1 The procedure for sharpening a brad point bit is similar to sharpening an auger. Use the end of an auger file with safe faces to file the spurs and the end with safe edges to file the cutting edge. There is one important exception, however. Instead of filing the leading face or lip of each cutting edge, file the trailing face or land.

When sharpening a drill bit, never hone the outside edge or circumference of the bit. You’ll change the diameter, and you may inadvertently grind the bit out-of-round.


SHARPENING A FORSTNER BIT


1
To touch up a Forstner bit, use a slip stone to hone the leading and trailing faces of each lifter. Hone the leading face first, pressing the stone flat against the surface. Then hone the trailing faces. The clearance notches on each side of the bit will let you reach them easily. Count your strokes and hone each side of the bit evenly.


2
Use the rounded edge of the slip stone to hone the inside edge of the rim. Roll the bit back and forth with your fingers while holding the stone against the rim.

Chips Off the Old Stone – If you've ever dropped a sharpening stone and chipped it, save those chips! A small stone chip with a flat surface is excellent for sharpening tasks such as these. The chip will balance easily on the leading and trailing faces, allowing you to find the angle and hone the edge accurately with just the tip of your finger.
 

This guide holds both spade bits and brad-point bits, helping guide the file as you sharpen. When sharpening spade bits, use the angled end of the jaw that’s cut 10 degrees off square. For brad-point bits, use the jaw that’s 20 degrees off square.

Place the bit between the jaws and clamp them together. Position the bit with the thumbscrew so the flutes or lands are about 1⁄64 inch above the angled surface of the jaw. Sharpen the bit until the cutting edges are even with the jaw, holding the file or stone parallel to it.

Back to the top
 

 "Abundant to all the needs of man, how poor the world would be without wood."
Eric Sloane in Reverence for Wood


Sharpening/Sharpening Drill Bits, part of the Workshop Companion,
essential information about wood, woodwork, and woodworking.
By Nick Engler.

Copyright © 2009 Bookworks, Inc.