Hardwax Finish

Hardwax oil finish is a unique wood finish that combines oils, resins and waxes to protect and enhance wood surfaces. The oils and dissolved resins penetrate the wood to nourish and strengthen it, while the wax component forms a durable, water-resistant surface. Hardwax oil leaves a natural, matte to satin finish that highlights the wood grain without creating a plastic-like film. Craftsmen find it easy to repair, as scratches can be spot-treated without refinishing the entire surface. It's a versatile finish that can be used on floors, furniture, countertops — almost any wood surface. It's eco-friendly ingredients and low-VOC content often make it safer and healthier choice than other common finishes.

Amazon Affiliate Links

Throughout this webpage we list links to the materials and hardwax oils we used in our studies, These will take you to the product on Amazon, where we earn a small commision if you buy through that link. There is no extra cost to you, and we very much appreciate your support.

DEFINING A HARDWAX FINISH

Unlike many finishes such as polyurethane or lacquer, the term "hardwax oil" or "hardwax finish" does not have a strict, universally agreed-upon definition. Instead, every major brand of hardwax oil defines itself according to its own unique formula. These often contain proprietary, secret ingredients that give their product its signature performance. But if you examine the known components across these different blends, a common pattern emerges. At its core, hardwax oil is a combination of wax suspended in a curing oil or resin, typically with a solvent added to improve application and penetration.

board butter made with mineral oil

Some of the most popular brands of hardwax oils.

Though the exact ratios and additives vary, this fundamental mixture of oils and waxes is what defines the mix as a hardwax finish — providing both deep nourishment and durable, natural-looking surface protection.

TYPES OF HARDWAX OIL

While these finishes share a consistant theme of "wax plus oil," there are two types of these hardwax finishes on the market.

One-Part (Reactive) Hardwax Oils:

These are ready-to-use straight from the can. They cure through exposure to air (oxidation) and typically take longer to fully harden.

The various ingredients we use when making board butter

Two-Part (Accelerated) Hardwax Oils:

Different from a true catalyzing finish, these include the finish (Part A) and an optional hardener (Part B) that's mixed in before application. TThis accelerates curing, improves durability, and increases chemical resistance.

It should be noted that some of these two part finishes, like Rubio and General Hardwax Oil, can be used without their hardeners They just take longer to cure.

beeswax, linseed oil, carnuba wax, melting and mixing in a double boiler

HOW THEY WORK

When oils and waxes are mixed, they form a temporary solution. Because waxes have a larger molecular size, they don’t penetrate as deeply as oils. During application, the components naturally separate: the oils soak in, while the waxes remain near the surface. This results in three distinct layers of protection with a single application.

mashing linseed oil board butter to make it spreadable

1. Deep Penetrating Layer (Oil)

Natural oils (like linseed or tung) penetrate into the wood fibers. They polymerize through oxidation, hardening within the pores and cell cavities. This provides internal protection against moisture and wear.

2. Transitional Layer (Oil-Wax Interface)

As the oil soaks deeper into the wood, wax begins to separate, due to differences in solubility and molecular structure. Some wax remains near the surface and within upper grain layers. This creates a semi-penetrating barrier, improving water repellency and adhesion between the inner and outer layers.

3. Surface Layer (Wax)

Natural waxes (e.g. carnauba, beeswax) have high molecular weight, so they do not penetrate deeply. They form a thin, breathable surface film that resists water, dirt, and light abrasion. This layer provides the distinct matte-sheen and soft-touch feel associated with hardwax finishes.

WOOD PREP

Because hardwax finishes don’t create a film like other finishes, they also don’t produce a reflective sheen on their own. The sheen you get depends to a large extent on how finely you sand the surface of your project.

Most woodworkers stop sanding around 220 grit, since going higher risks burnishing the surface and packing the wood pores with fine dust, which can reduce how well the finish bonds and penetrates.This logic holds true for most hardwax oils. However, in our experience, sanding up to 600 grit gave the most attractive results — with a subtle sheen and a pleasantly smooth feel. Sanding beyond 600 grit produced diminishing returns cosmetically and was not worth the extra effort.

Nick applying his hardwax oil to a peice of mahogany plywood with a foam brush

To help with penetration at higher grits, you can “pop the grain” by wiping the wood with a damp cloth, letting it dry completely, and then lightly sanding again with your final grit. You should also wipe the surface with a tack rag and/or blow it with an air gun to remove all the stray dust. This helps raise and remove fine fibers, cleans out some of the impacted sawdust from the pores, and reduces the tendency of the grain to swell when the finish is applied. We also found that pieces we water-popped had a slightly more pronounced sheen, with a cleaner, more even look overall.

Nick applying his hardwax oil to a peice of mahogany plywood with a foam brush

HOW TO APPLY

One of the biggest advantages of hardwax finishes is how easy they are to apply. They’re very forgiving, making them an excellent choice for beginners and professionals alike. With just a few simple steps, you can achieve a durable, natural-looking finish that’s hard to mess up. Note: If any of the following instructions differ from the manufacturer’s, go with the manufacturer. (But we do encourage you to experiment.)

One-Part Hardwax Finishes

  1. 1. Stir thoroughly to ensure waxes and oils are evenly mixed.
  2. 2. Apply a thick, even coat using a brush, foam brush, or squeegee. (Rags or cloths may soak up too much of the finish — this can be wasteful.) Then vigorously work the finish into the wood with a pad — tightly folded cloth, paper towels, leather, or fine Scotchbrite. (We preffered the Scotchbrite. Grey Scotchbrite is about 600 grit, white Scotbrite is about 1200 grit,)
  3. Nick applying his hardwax oil to a peice of mahogany plywood with a foam brush
  4. 3. (Optional) Use a heat gun to gently warm the surface, reduce viscocity, and encourage deeper penetration. Do not heat it anymore than is needed to barely melt the wax.
  5. heating hardwax finish with a heatgun
  6. 4. Let the finish sit to allow it to penetrate. The amount time is different for each brand; check the instructions. If the instructions give you a range of times, longer is better.
  7. 5. Wipe off all excess and buff the surface with a clean, lint-free cloth until it feels dry to the touch.
  8. polishing hardwax finish with microfiber cloth
  9. 6. (Optional) Wait at least 24 hours, then applya second coat the same way.

Two-Part (Accelerated) Hardwax Finishes

  1. 1. Mix the finish with the hardener according to the manufacturer’s instructions.
  2. 2. Apply a thin coat to the surface and work it in with a pad as we describe in the previous section.
  3. 3. Let the finish penetrate for the recommended "dwell time." Again, this varies with the brand -- check the instructions. Note: You don't want to use the heat gun hack described in the previous section with two-part finishes. The heat will speed up the chemically-accelerated curing and this will limit penetration.
  4. 4. Wipe off excess and buff the surface thoroughly. Note: There is little benefit in applying more than one coat to most two-part finishes, as their names often imply, e.g. Rubio Momocoat and Natura Onecoat.

COMPARING FINISHES

When comparing the hardwax finish brands, we found very little difference. The Two-Part (Accelerated) Hardwax Oils cured the faster, but they were also the hardest to apply.

We've prepared a PDF, "Comparing Hardwax Finishes" that is FREE to view and or download. This PDF booklet includes high-definition photos of all the test boards we prepared which will make it easier to see the differences between finishes. Based on our tests, we evaluated these finishes for ease or application, sheen and reflectivity, how pleasant the cured finish was to the touch, and how it changed or "warmed" the wood color. We also included a cost comparison between the brands we tested and other popular finishes. Unfortunately, we haven't yet had time to test for durability or other long-term factors, and we could not find reliable information other than the manufacturers' claims. We will amend this as we gain more experience and more info becomes available.

polishing hardwax finish with microfiber cloth

Of the finishes we tested, our favorite was Tried & True. That was based on appearance, cost, and the other factors we listed. But as we said, the results of these tests were very close. Any difference we found might have been due to natural variations in the wood grain in our test boards as well as the different brands. They all performed well enough to earn the asking price.

MAKING HARDWAX FINSH

Before diving into the topic of hardwax oils we dabbled in the arts of making "Board Butter". Rather than using the classic mineral oil / beeswax combo we changed it up a bit by using raw linseed oil, beeswax, & carnauba wax. What we ended up with was wax suspended in a curing oil... sounds familliar right? While our recipe for board butter can be classified as a hardwax oil it's a bit heavy on the wax side. We wanted to make something that was more similar to the big brand hardwax finishes on the market. So Nick and I split our efforts and created two recipes. Nick focused on durability while I focused on a less toxic blend. (Both of these are one-part hardwax finishes.)

2 jars of of homemade hardwax finish side by side

* Nick's blend on the left, Travis's blend on the right.

In our recipes, we both found that using 10–20% wax, 10–20% solvent, and 60–70% oil created a finish with a smooth, workable viscosity that was easy to apply and left behind a pleasant wax coating.

NICK'S RECIPE

This blend uses boiled linseed oil with a touch of spar urethane to create a deep-penetrating, hard-curing base with the optical properties to enhace the wood grain. Beeswax is added for it's ductility, ease of application, and moisture resistance; carnauba for it's durability and highly reflective finish (after buffing). For the solvent, Nick chose mineral spirits — it’s readily available, affordable, and effective at keeping the waxes suspended in the oil.

A can and jar containing Nick's hard wax finish

if you you want the printable labels we use on our cans click HERE for a free download.

Materials/Tools

Recipe

  • 2.0 oz /57 g Beeswax
  • 0.5 oz / 14 g Carnauba
  • 2.5 oz / 71 g Mineral Spirits
  • 2.5 oz / 71 g Spar Urethane
  • 7.5 oz / 213 g Boiled Linseed Oil

All of the ingredients used to make nick's hardwax oil, beeswax, carnauba, mineral spirits, spar urethane, boiled linseed oil.

Just to Be Safe

Heating solvents — and oils that already contain solvents — can raise them past their "flash point," the temperature at which they begin to evaporate and release combustible VOCs (volatile organic compounds) into the surrounding air. Always mix these recipes in a well-ventilated area and use appropriate protective equipment such as gloves, eye protection, and a respirator as needed.

Never use an open flame as a heat source. Not only can this ignite the vapors, the mixture itself is flammable. Instead, use an electric hot plate and a double boiler or other indirect heating method, and monitor the temperature carefully — aim for no more than 175°F, just enough to melt the wax.

Mixing

Mix the ingredients in a double boiler on an electric hot plate. The boiler should keep the temperature fairly low. You only need to get the mix warm enough to melt the beeswax and carnauba — about 165F or 74C. Bringing it up to 175F (80C) will speed up the process. Keep in mind that at this temperature you are heating some ingredients past their flash point. It's a good idea to keep a fire extinguisher handy just in case. At the very least, have a handy way to smother the flames should you need to.

All of the ingredients used to make nick's hardwax oil, beeswax, carnauba, mineral spirits, spar urethane, boiled linseed oil.

Let the mixture cool, stirring occasionally. Once it reaches room temperature, put it in an airtight can (if it's not in one already) and install or tighten the lid. Like any other finish, you want this mix to have as little contact with the air as possible; otherwise the solvents will evaporate and the oils will begin to polymerize (cure).

When you're ready to use this finish, it can be applied like any other one-part hardwax oil, as we described in the How to Apply section. This mixture will take around two weeks to fully cure. But like all respectible hardwax oil finishes, it can be handled after buffing. Note: Like most finishes, this can be conbsidered food-contact safe after curing; but I hestitate to say that when boiled linseed oil is involved. This stuff often has heavy metal driers that are best kept away from your mouth, especially if you're under twelve years old. If you need a safer finish, go onto the next section.

The More You Know

  • Mineral spirits (a.k.a. Paint Thinner) has a flashpoint around 105F or 40C, it is the most commonly used solvent in wood finishes.

TRAV'S RECIPE

This is a less toxic blend containing no heavy metal driers. It's primarily raw tung oil with a splash of raw linseed oil. I added beeswax and carnauba wax for the same qualities cited in Nick's recipe. The oils and waxes are suspended in highly concentrated d-limonene, which provides a pleasant citrus scent that surprisingly overpowers the odor of the raw oils. And I added a few milliliters of vitamin E oil to extend the shelf life of the raw ingredients. In my batch, I used the more affordable material brands on the market, which are not labeled as food safe. However, they will be food-contact safe when cured. If you need to make them fully food safe, select food-grade materials — they are expensive, but they are available online.

A can and jar side by side containing Travis's hard wax finish

if you you want the printable labels we use on our cans click HERE for a free download.

Materials/Tools

If you wish, you can substitute "white" or Refined Beeswax for the more common variety. Refined beeswax has a more uniforn color and does not "yellow" the wood to which it's applied (as much). It also has less scent and fewer impurities.

Recipe

  • 1.0 oz / 28 g Beeswax
  • 0.5 oz / 14 g Carnauba
  • 2.5 oz / 71 g d-Limonene
  • 1.0 oz / 28 g Raw Linseed Oil
  • 8 oz / 227 g Raw Tung Oil
  • 0.06 oz /2 g Vitamin E Oil

All of the ingredients used to make Travis's hardwax oil, beeswax, carnauba, D-lemonen, raw tung oil, raw linseed oil, vitamin e.

Just to Be Safe

While this blend uses a less toxic solvent (d-limonene), it still contains oils and waxes that can release VOCs when heated. Always mix and heat the recipe in a well-ventilated area, and use appropriate protective gear such as gloves, eye protection, and a respirator if needed.

Never use an open flame as a heat source — d-limonene is flammable, you're heating it well past its flash point (118F or 48C) and its vapors can ignite. Use a double boiler or another indirect heat method, and monitor the temperature closely. Heat only until the waxes melt, around 170–175°F (77–80°C), then remove from heat and let it cool.

Mixing

As with Nick's recipe, mix the ingredients in a double boiler on an electric hot plate. Add the raw tung oil, raw linseed oil, carnauba, and beeswax to your double boiler and heat to 165–175°F (74–80°C) until the wax melts and fully combines with the oils. Stir for a few minutes, then turn off the heat and allow the mixture to slowly cool in the double boiler.

Once the mixture cools to around 145°F (63°C), add the vitamin E oil — any hotter and the heat may degrade it, reducing its effectiveness. When it reaches 140°F (60°C), add the d-limonene. For best results, continue stirring as the mixture cools to room temperature. Note: By adding the d-Limonene at a lower temperature, less of it evaporates.

close up of trav's hardwax oil ingredients in a double boiler with wax just starting to melt

You may find that the finish thickens after it has cooled for a day. In my experience, simply giving it a good stir brings it back to a pudding-like consistency — and it usually doesn’t thicken again. This blend is quite sensitive — even small variables can affect its consistency.

You can apply the finish just like the other hardwax oils shown in the How to Apply section. Since this mixture uses raw oils, it can take up to a month to fully cure. And like the other blends, it can be safely handled once it has been buffed.

Notes

D-limonene behaves a bit differently than mineral spirits — it doesn't dissolve waxes quite as effectively. To counter this, I found it’s very important to stir the mixture continuously as it cools. Let it cool slowly — rapid cooling can cause the ingredients to separate.

Depending on the size of the batch, cooling can take a while. D-limonene may have some of the most pleasant-smelling fumes you’ll ever encounter, but don’t be fooled — it’s still toxic. Rather than standing over the pot inhaling the fumes, I recommend using an automatic stirrer to make the process safer and easier.

All of the ingredients used to make nick's hardwax oil, beeswax, carnauba, mineral spirits, spar urethane, boiled linseed oil.

This auto stirrer did a fantastic job at blending the ingredients as the mixture heated and cooled, saving us from fumes, helping the wax melt, and ensuring a smooth, even consistency. If this interests you, this affliate link will take you to the auto stirrer we used.

VARIABLES

When making your own hardwax finish, even the smallest changes in your recipe, cooking, or mixing process can affect the final outcome. Some variables include:

  • Amount of each ingredient
  • Type of solvent used
  • Temperature at which each ingredient is added
  • Stirring technique and frequency
  • Cooling rate

The more wax you use, the thicker your blend will be once it cools. The more solvent you use, the thinner and more spreadable it becomes. Getting the ratio just right determines how easy the finish is to apply. If you don’t mind spending extra time working the finish across your project, you might even try using no solvent for a truly food-safe blend.

Close up of Nick's blend using d-limonene with minimal stirring.

Travis's blend with an extra 0.5 oz of d-limonene and using the auto stirrer through the entire mixing process.

If you decide to add all the ingredients at once — as in Nick's recipe — you may end up with a smoother, more unified blend. However, it’s worth considering how much solvent may have evaporated by the time the mixture cools. I found that adding the solvent at 140°F (60°C), while the mixture was still liquid, gave similar results while reducing the time the solvent was exposed to higher temperatures near its flash point.

Nick used mineral spirits in his blend and did very little stirring. He also used more wax than I did in my blend, yet his finish ended up being more fluid. When we replaced the mineral spirits in Nick’s blend with d-limonene, it went from a runny, creamer-like consistency to something closer to Vaseline. According to safety data sheets, d-limonene is less harmful to both peole and the environment — it’s easy to understand why so many products use this citrus-derived solvent. But it does require more effort to work with.

Close up of Nick's blend using d-limonene with minimal stirring.

Nick's blend using d-limonene with minimal stirring.

Additional Materials

We’ve kept our finishes fairly simple, especially when you consider all the materials available on the market. If you’re like us, you might find yourself losing sleep thinking about all the potential ingredients and processes you could experiment with to create your own unique blend.

What if I add a little tree resin, like pine or copal? Would using boiled linseed oil without heavy driers help speed up the cure time? What could I add for UV protection?

The possibilities are endless, and we encourage you to do your own research and experimentation — while practicing proper safety. If you come up with something you really like, please share your recipe with us!

Close up of travis's hardwax oil with 1 gram of added zinc oxide

Travis's blend with 1 gram of Zinc Oxide Powder (Affiliate link) to add some uv protection.

Conclusion

Pros

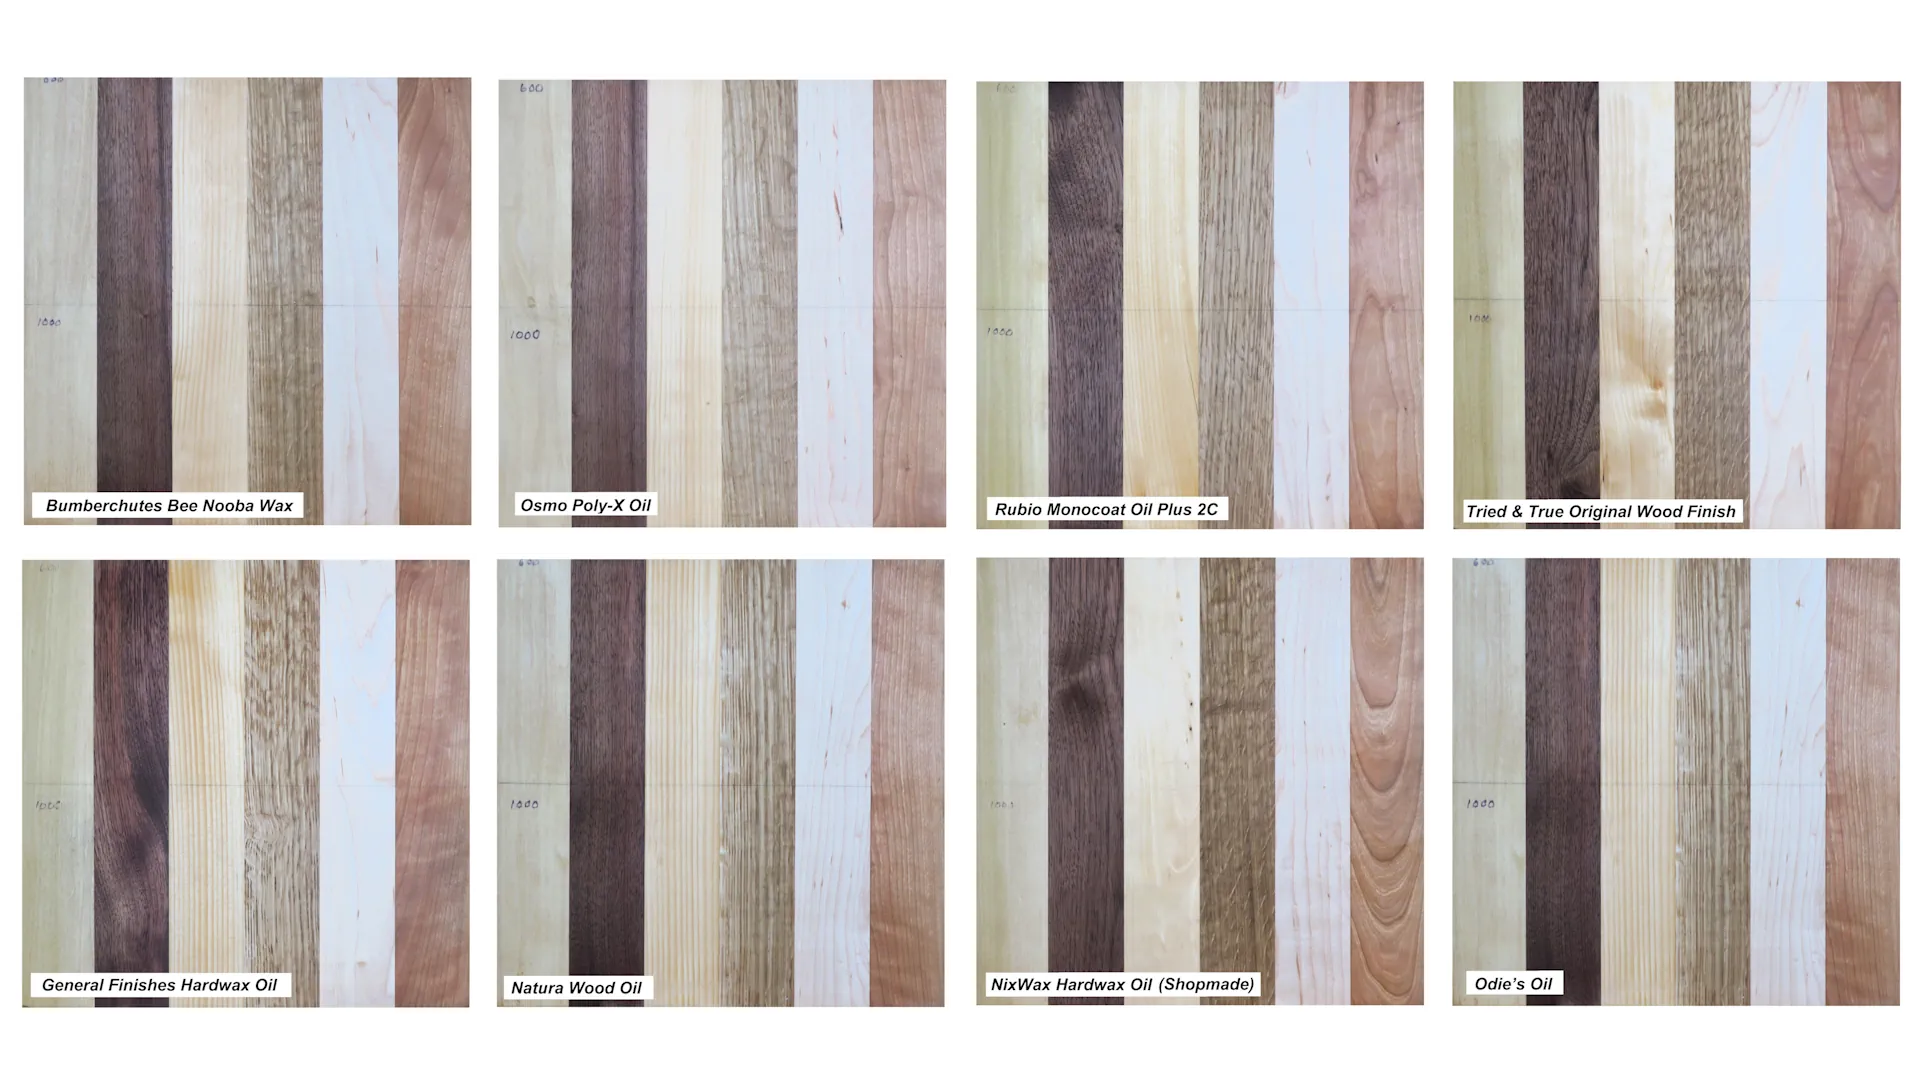
These hardwax oils are great for folks who are new to woodworking, and are safer health-wise and environment-wise than many traditional finishes. They contain fewer solvents, cover more surface area per ounce, and reduce VOCs in your workspace. The added wax offers solid water and heat resistance while leaving behind a sleek surface with a wonderful feel. 
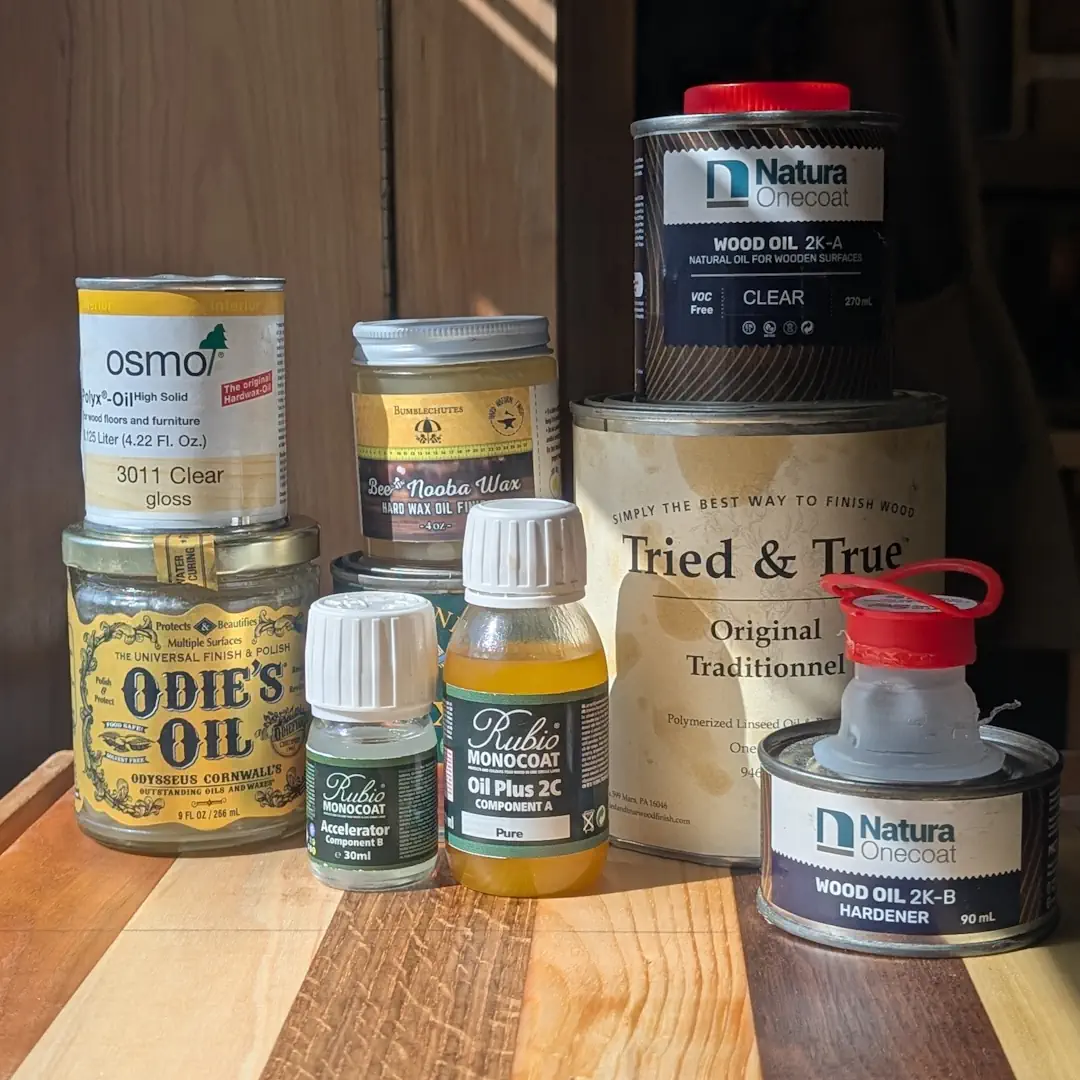
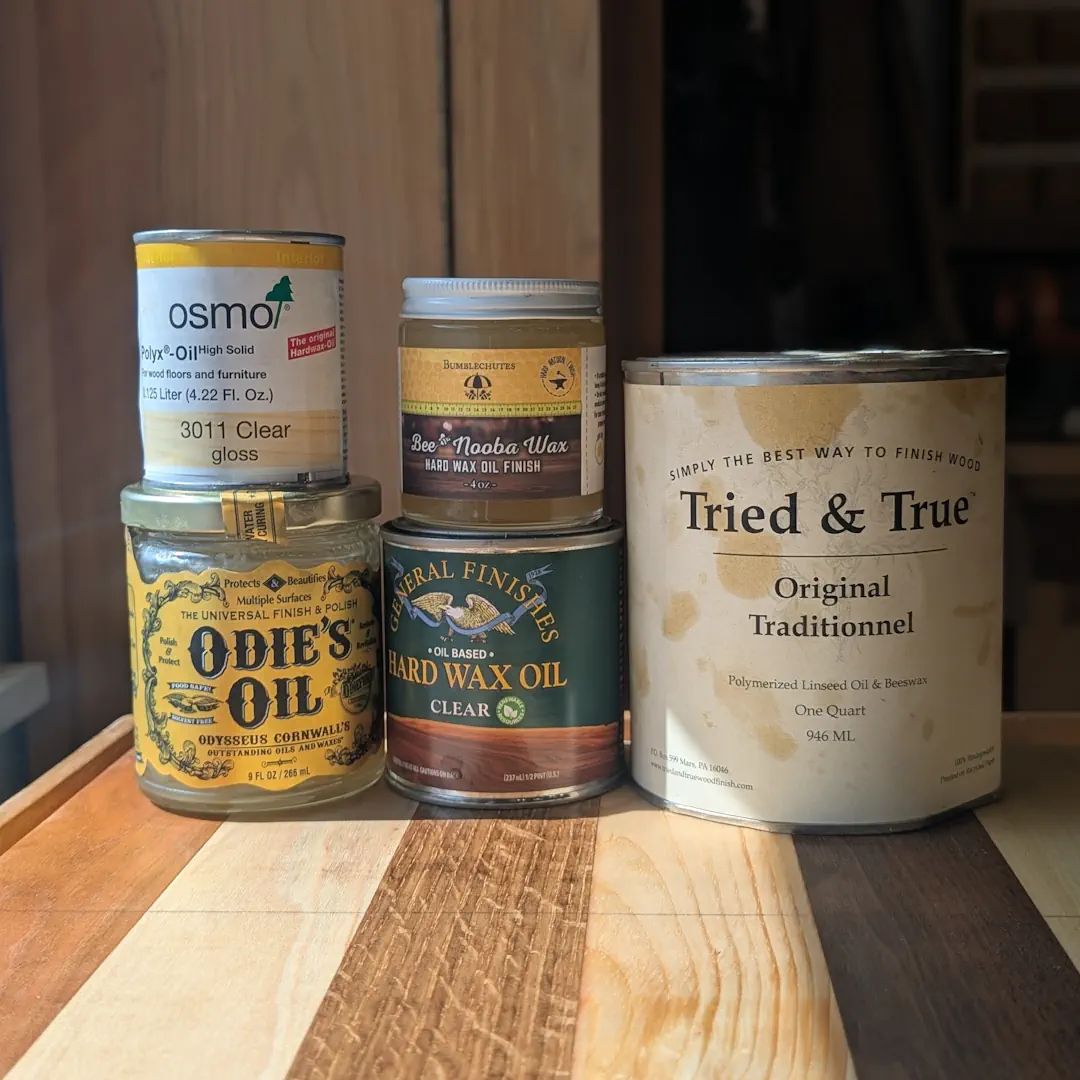
Considering the less toxic blends like Odie’s, Bee Nooba, and Tried & True, hardwax oils may be among the most durable finishes suitable for kitchens or projects for children and pets. They’re easy to reapply, making touch-ups a breeze, and the soft matte finish is especially appealing in today’s age of plastic-looking surfaces.

Cons

Averaging around $4.00 per ounce, the price of name-brand finishes can seem a bit absurd — unless those proprietary formulas include vacuum-boiled shark fins, it’s hard to justify. 
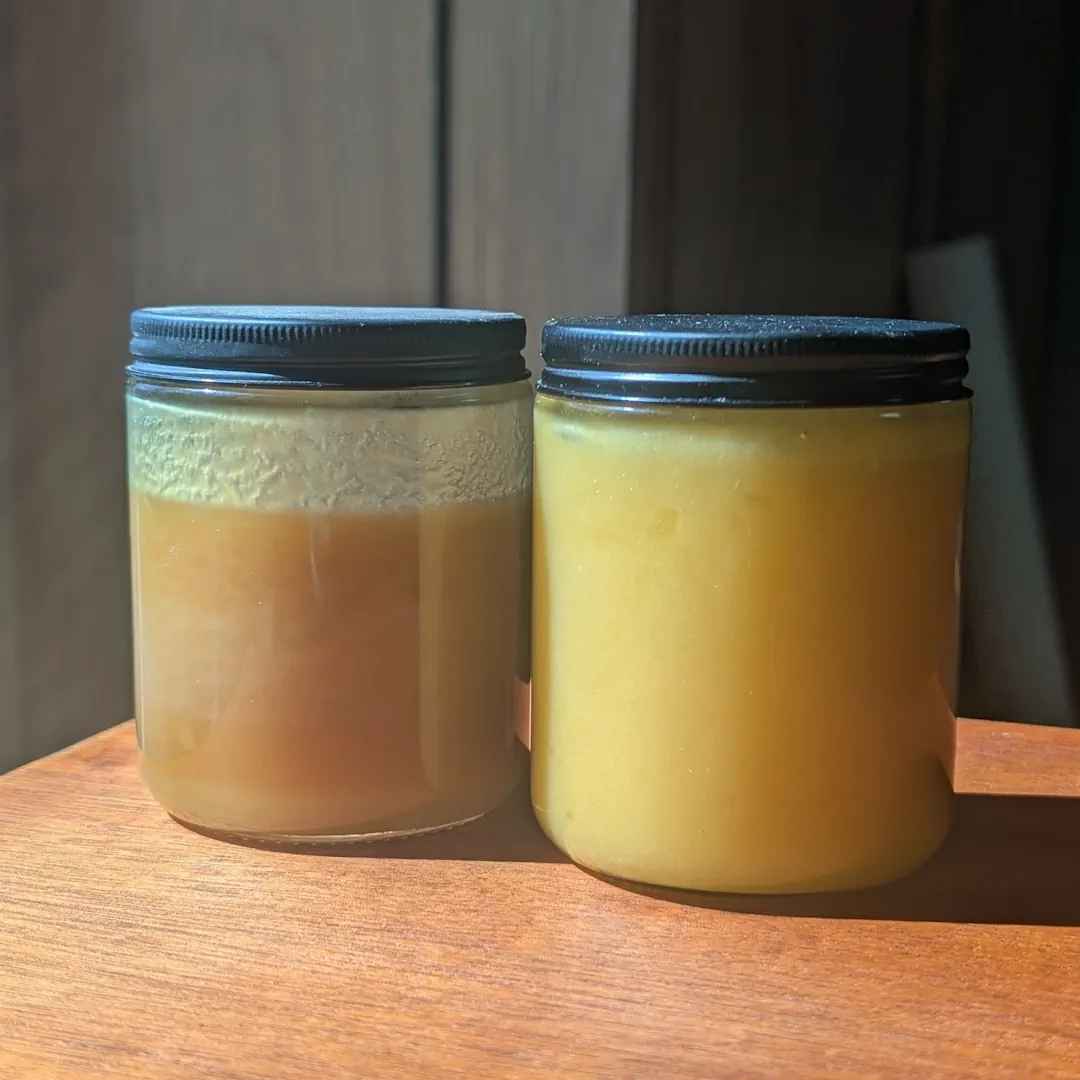
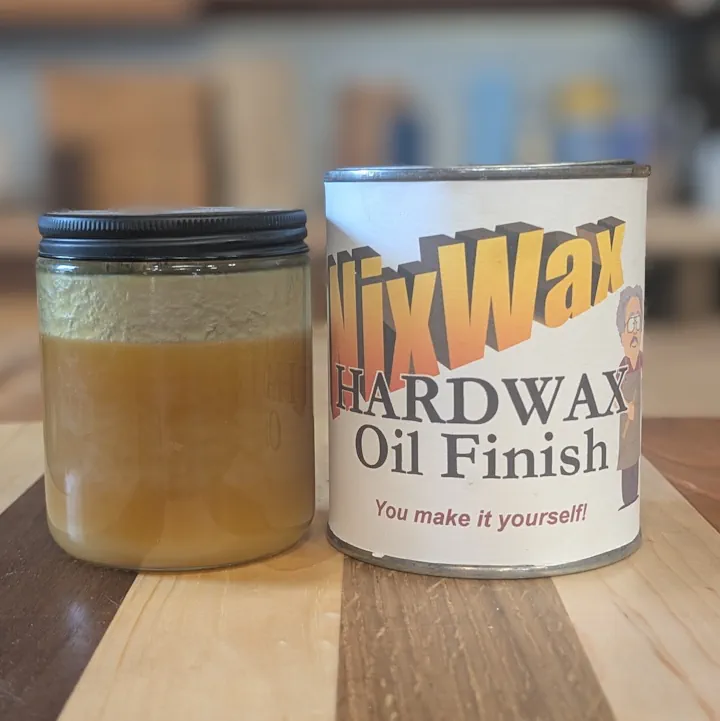
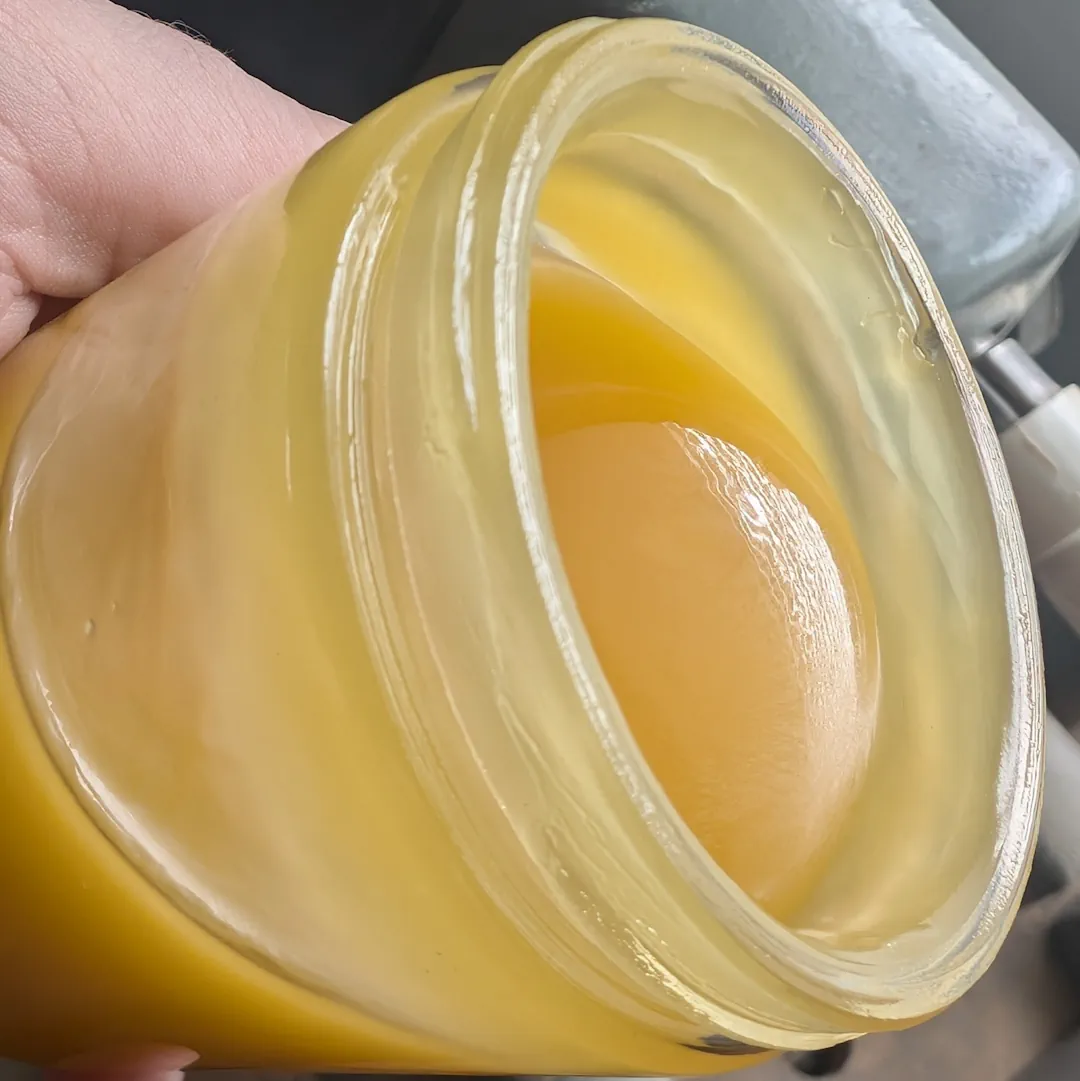
That said, I can’t be too critical — I have no idea how Odie’s Oil achieves such a honey-like consistency while claiming to contain no solvents. 
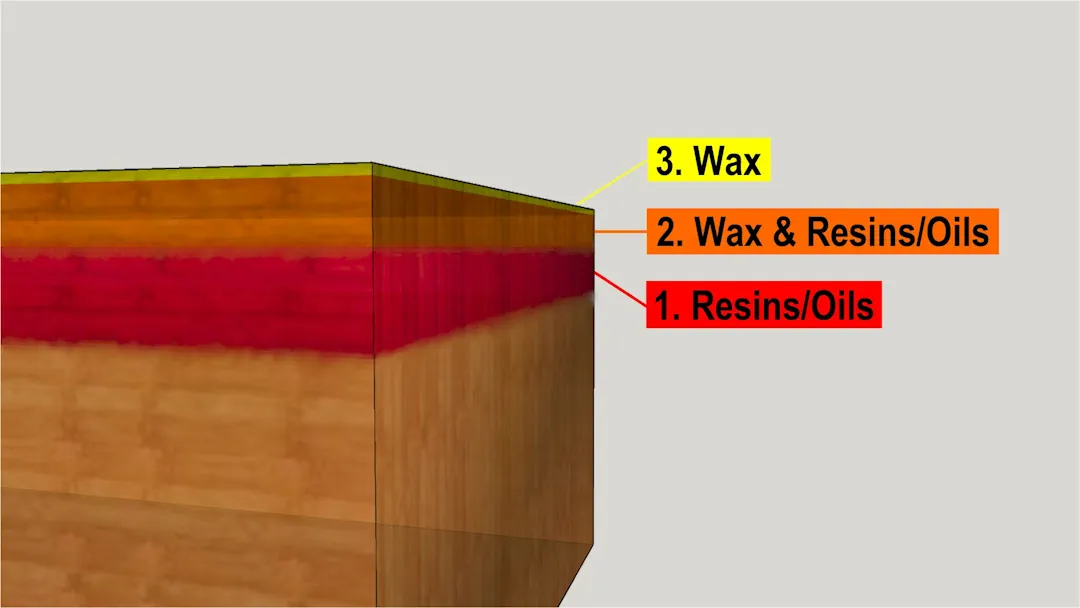
Price aside, I worry that the Transitional Layer (Oil-Wax Interface) might make it difficult to stain your project later. (We didn’t test this, but viewers have reported having this experience). Also, since hardwax oils don’t produce a protective film, any scratches or dents go into the wood itself. And if you're after a glossy finish, hardwax oils may disappoint — they don’t build shine easily, and you can’t topcoat them with other finishes due to the wax.

Our Thoughts

At the end of this adventure, Nick and I both found hardwax oils to be less attractive than other options. Nick will stick with Minwax Tung Oil followed by a coat or two of Rudy’s formula (eight parts tung oil finish to one part spar varnish) as his go-to, and I’ll continue using Minwax Wipe-On Poly. Neither of us plans to buy more of the pricey hardwax finishes anytime soon — especially after spending nearly US$200 for very small quatities of name-brand hardwaxes to test in our video. But for kitchen utensils, toys, and other food-contact or kid-safe projects, hardwax oil may very well become our new favorite. We’re both excited to see how our own blends holds up over time — and we'll report the results here sometime down the road.

SUPPORT US

If you enjoyed the article and want to ensure we make more on other topics, you can support us by purchasing Nick's books and project plans at the Workshop Companion Shopify Store. And — as always — thank you for your kind attention.

chisel edge geometry

Back to Top