Name Teak
Location Southeast Asia, Indonesia
Texture/Grain Coarse/Open
Specific Gravity 0.55
Hardness Medium
Strength Strong
T/R Stability 5.8/2.5%


Guide

Woodworking
Know-How

Woodworking
Tools

 Up     

Sharpening

1. How a Tool
Cuts Wood

2. Sharpening
Know-How

(You are here.)

3. Sharpening
Tools & Materials

4. Sharpening
Chisels & Plane Irons

5. Sharpening
Skews & Gouges

6. Sharpening
Parting Tools

7. Sharpening
Knives

8. Sharpening
Hand Saws

9. Sharpening
Drill Bits

10. Sharpening
Scrapers

11. Touching Up
High Speed Cutters

12. Sharpening
Resources


Looking for
something?

Try these navigation aids:

  Site Map

Site Index

Search the
Workshop Companion

        
Something to share?
Please:

Contact Us!

hile cutting is a wonderful thing, all cutting tools wear as you use them. The wood itself, particularly tough fibers and mineral extractives, erode and abrade the metal, dulling the edges. If you use cutting tools, sooner or later you will have to sharpen them.

To sharpen a dull tool, you must do three things:

bullet

Hone a keen edge with progressively finer abrasives.

bullet

Restore the edge to the proper tool angle.

bullet

Grind it to the proper shape.


HONE A KEEN Edge

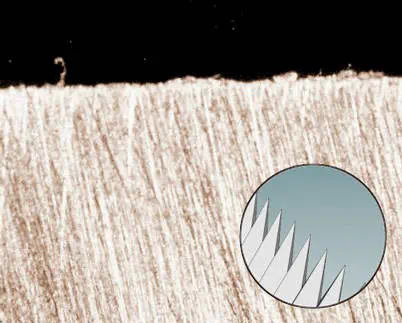
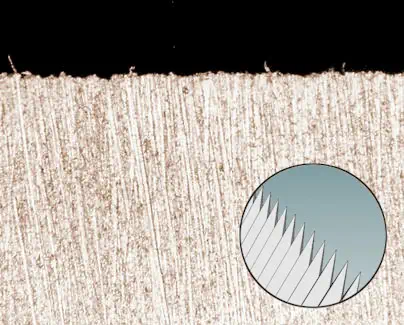
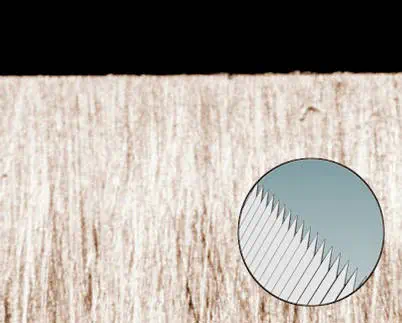
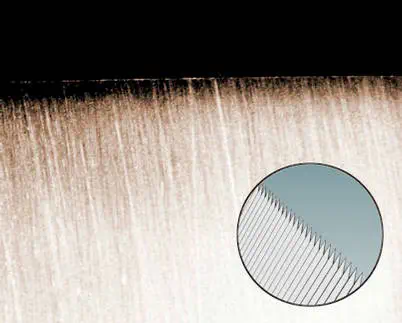
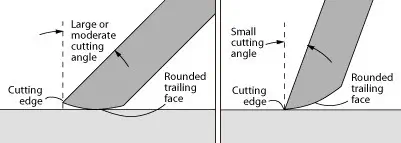
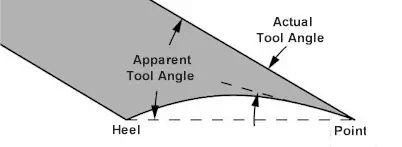
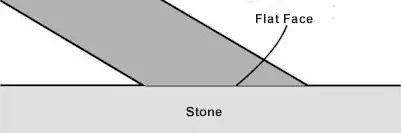
To create a crisp, keen cutting edge, finish the metal surfaces with progressively finer abrasives, making them as smooth as possible. If you use only coarse materials to sharpen, the edge will be rough.

When you sharpen, the abrasives cut small grooves in the surface of the metal -- both the leading face and the trailing face. These grooves intersect at the cutting edge. On a microscopic level, they appear to form tiny teeth. The finer the grit of the abrasive, the smaller the teeth, the the closer the cutting edge comes to forming a single, crisp line -- a perfectly keen edge.

Why not sharpen with just one fine grit? Because it's difficult to remove damaged areas and restore badly

worn edges with fine grit. You also run the risk of overheating the tool if you use power sharpeners -- fine grits produce heat faster than coarse grits. Coarser grit removes metal faster and keeps the tool cool. It's faster and safer to work your way up through a series of progressively finer grits.

How fine should you sharpen? That depends on the tool and your personal preferences. For most applications, it’s sufficient to grind and hone to between 500 and 700 (U.S.) grit. But many craftsmen polish and strop to 1,200 grit and beyond for the keenest possible edge.

There are four sharpening levels, roughly defined by the abrasive grits used. As you sharpen with finer and finer grits, the cutting edge grows keener. NOTE: The grits are graded according to the U.S. system.


GRINDING (60 – 300 GRIT)

HONING (300 – 700 GRIT)

POLISHING (700 – 1,200 GRIT)

STROPPING (ABOVE 1,200 GRIT)

RESTORE THE TOOL ANGLE


To maintain the correct tool angle as you work your way through finer abrasives, use a sharpening guide or a tool holder. This eliminates the natural tendency to rock the chisel as you sharpen it, thereby rounding the face. You can get away without guides when you’re just touching up a tool — polishing a slightly-worn edge— because you don’t remove much metal. But even experienced sharpeners admit they can maintain the tool angle more precisely with a guide.


If you inadvertently round the trailing face (giving it a cannel grind) when you sharpen a tool, the cutting edge will not meet the wood unless you decrease the cutting angle.


The sharpening guide shown -- from Veritas -- is designed for hand sharpening straightedge chisels and plane irons. There are many types of guides not only for different tools, but also for hand sharpening and machine sharpening. The purpose of all of them is to maintain a constant angle as the tool is sharpened.

GRIND THE PROPER SHAPE


Most woodworking tools are ground flat by the manufacturers. There’s rarely any reason to change to a cannel grind, but a hollow grind offers an advantage in some applications.

On a hollow grind, the actual tool angle (at the point) is 2 to 5 degrees less than the apparent tool angle (at the heel), depending on the radius of the abrasive wheel and the length of the hollow face. This reduces the force needed to drive the tool. However, there is a trade-off — a hollow-ground tool has less metal to buttress the cutting edge and it wears faster. For this reason, hollow-grind only light-duty tools such as carving knives and paring chisels. Others are best flat-ground.


HOLLOW GROUND CUTTING EDGE

Sharpen more, grind less -- Some craftsmen hollow-grind a face before they flat-grind the cutting edge. This practice doesn’t change the force needed to drive the tool or the durability of the cutting edge. Instead, it reduces the amount of metal that must be removed to restore the edge and speeds the sharpening process.


METAL REMOVED FROM ENTIRE FACE


METAL REMOVED FROM POINT AND HEEL ONLY

MICROBEVELS


You may also wish to add a microbevel to a cutting edge after sharpening it. A microbevel (also called a secondary bevel) is a tiny bevel at the point that increases the tool angle. It helps remove burrs and makes the edge more durable. (It does not make the edge sharper; that’s a myth.) Because the microbevel is so small, the force required to make the cut increases only slightly. 

To make a microbevel, sharpen the tool as you would normally. Then increase the tool angle a few degrees and make 2 or 3 passes — no more — over the finest abrasive. If the normal tool angle is 15 to 20 degrees, make the microbevel 5 to 7 degrees steeper. If it’s more than 20 degrees, make it 3 to 5 degrees steeper. Tool angles of 30 degrees or more rarely need a microbevel; they are plenty durable without one.


In most cases it’s best to make a microbevel on the trailing face of a tool so it decreases the clearance angle. This is because the clearance angle is usually less critical than the cutting angle. However, if the clearance angle is extremely small, you will be better off making the microbevel on the leading face.

Back to the top
 

 "Abundant to all the needs of man, how poor the world would be without wood."
Eric Sloane in Reverence for Wood


Sharpening/Sharpening Know-How, part of the Workshop Companion,
essential information about wood, woodwork, and woodworking.
By Nick Engler.

Copyright © 2009 Bookworks, Inc.